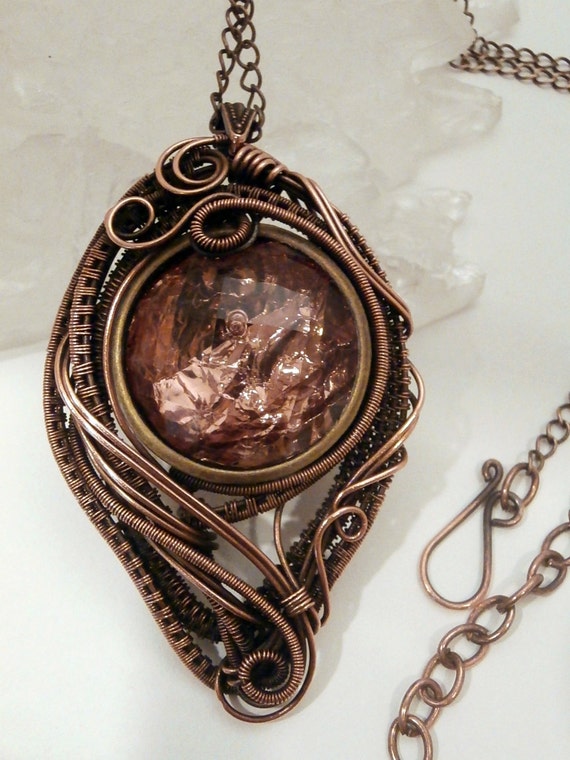
As requested! The fabulous five are now offered together in one extraordinary bundle! This is an $11.48 savings if purchased through this bundle vs individually.
Click here to go straight to the store listing!
Bundle price is $42.24
You'll have hours of challenging fun applying your wire skills to these projects! You'll learn versatile and beautiful jewelry designs which can be used for unique gifts or to sell in your jewelry store! There are hundreds of clear and close up images with detailed instruction through out every project.
This bundle offers everything you might want to add to your already unique and beautiful collection of handmade jewelry projects! While the tutorial content is copyrighted and not redistributable in tutorial form, you CAN use any of these designs for resale in actual jewelry form. So have fun expanding your wire jewelry offerings or take your 'hobby' to the next level and use these designs to open up shop!
My passion is to share this amazing art form and I work feverishly to create new and eye catching designs, so please keep checking back with my tutorial catalog!
https://www.etsy.com/shop/PerfectlyTwisted?section_id=10423914
These projects are intermediate to advanced.
The wire sizes needed are:
12 gauge
20 gauge
22 gauge
26 gauge
28 gauge
30 gauge
All wires are Round, Dead Soft
Bead sizes range per project and are described in each individual supply list. Or you are welcome to check the supply list on the individual listings which can be found in my Tutorials Categoryhttps://www.etsy.com/shop/PerfectlyTwisted?section_id=10423914
All of these files are instant downloads and can be saved to your computer, after purchase, by pressing the DOWNLOAD buttons from the Order page.
I'm here for you too, so if you have any questions or need advice on finding supplies, feel free to email me any time.
Showing posts with label wire weaving. Show all posts
The How To... A Picture Tutorial on Wire Weaved Jewelry... Create a Wire Wrapped Pendant ...Part 1

I've had several emails asking 'how' do I create some of these pendants... so I thought I'd share these images with you and give you a peak into the studio. I hope you enjoy the 'picture tutorial' and find inspiration for your wire craft! Click each image to enlarge and get a closer look at the wire.
1 inch by 1 inch glass focal bead
Five, 20 gauge, bare copper wires, approximately 1 foot each
Lots of 28 gauge, bare copper weaving wire ;)
Patience... and good lighting.
CoolTools Patina Gel
1.
Labels:
advanced,
copper,
free,
glass,
images,
jewelry,
pendant,
tutorial,
wire sculpting,
wire weaving,
wire wrapping
How to Make a Wire Danish Love Knot - Free Tutorial
I owe many thanks to Blue Forest Jewellery for this wonderful and informative tutorial! I've been searching the internet for clear instructions on how to make the infamous "Love Knot" also known as the "Danish Knot" and today, I found it! Please, take the time to visit this delightful and talented artist.
This is the link to Blue Forest Jewellery's blog and the tutorial:
http://blueforestjewellery.blogspot.co.uk/2012/01/handmade-monday-how-to-make-danish-love.html ...
This is a link to Blue Forest Jewellry's Etsy store:
http://www.etsy.com/shop/BlueForestJewellery
I spent the morning creating these and wanted to share the measurements with you because I came to find that getting those 'right' for a nice tight, clean looking bead, took the most time. After that, it was just a matter of great patience :))
Click each image to enlarge
For these 10mm knots, I used
22 gauge, dead soft, bronze jewelry wire
5 mm mandrel
each coil contains 5 loops, between each cut
3 coils per bead
.JPG)
.JPG)
For these "20" mm knots, I used
20 gauge, dead soft, bronze jewelry wire
10 mm mandrel
each coil contains 8 loops, between each cut
3 coils per bead
You'd think the math would work out to be 10 loops per coil, but when I tried that, the coils were simply too tight to get linked together. The bead you see on the left contains 8 loops each, between the cuts, while the on the right contains 7 loops between each cut end. You'll notice that the one on the right, while it doesn't look bad, is definitely not as tight or neat as the one on the left. One extra loop per coil makes a difference, in my opinion. Anyway, I hope you enjoy and again, I encourage you to give the Blue Forest Jewellery tutorial a try.
This is the link to Blue Forest Jewellery's blog and the tutorial:
http://blueforestjewellery.blogspot.co.uk/2012/01/handmade-monday-how-to-make-danish-love.html ...
This is a link to Blue Forest Jewellry's Etsy store:
http://www.etsy.com/shop/BlueForestJewellery
I spent the morning creating these and wanted to share the measurements with you because I came to find that getting those 'right' for a nice tight, clean looking bead, took the most time. After that, it was just a matter of great patience :))
Click each image to enlarge
For these 10mm knots, I used
22 gauge, dead soft, bronze jewelry wire
5 mm mandrel
each coil contains 5 loops, between each cut
3 coils per bead
For these "20" mm knots, I used
20 gauge, dead soft, bronze jewelry wire
10 mm mandrel
each coil contains 8 loops, between each cut
3 coils per bead
You'd think the math would work out to be 10 loops per coil, but when I tried that, the coils were simply too tight to get linked together. The bead you see on the left contains 8 loops each, between the cuts, while the on the right contains 7 loops between each cut end. You'll notice that the one on the right, while it doesn't look bad, is definitely not as tight or neat as the one on the left. One extra loop per coil makes a difference, in my opinion. Anyway, I hope you enjoy and again, I encourage you to give the Blue Forest Jewellery tutorial a try.
Subscribe to:
Posts (Atom)