skip to main |
skip to sidebar


This is a wonderful and fun earring design, created so that you can attach most side drilled beads that are marquee shape, oval or teardrop. With small alterations to the wire and bead sizes, you can also use this pattern to make a matching pendant for the earrings!
Please check out my Etsy jewelry store and learn how to make wire jewelry with my easy to follow jewelry tutorials and patterns.
The earrings will measure approximately 2 inches long (including the ear wires) and 3/4 inches wide. There are 19 pages, over 132 clear and close up images in 48 detailed steps to guide you through the project. The estimated project time is 3 hours.
The tutorial uses copper wire, but you can use any type of wire. It is important however, to use the
sizes indicated in the supply list or contact me with questions regarding using other size wires. I’m happy to help.
Enjoy! Purchase this jewelry tutorial pattern in my Etsy store...
https://www.etsy.com/shop/PerfectlyTwisted
To go directly to the listing for the tutorial, click here.
Supplies: All wire is round, dead soft
20 gauge wires (frame wires)
30 gauge wires (weaving wire)
2 Marquee beads 26mm x 10mm, side drilled
2 Round beads 4mm
Tools:
Nylon nose pliers
Flat nose pliers
Round nose pliers
Wire cutters
Jewelers file or nail file
15 mm dowel (or a cap from a 4oz Elmer’s glue bottle)
Grid paper (optional)
You asked for my ear.... so now you have it! :))
You can shop for this wonderful tutorial at my Etsy store...
Click here to go directly there.
This is one of my most favorite designs and I created it so that it would be a wonderful compliment to the Majestic Mother of Pearl Pendant Tutorial.
This pattern is gorgeous and can be created with any type of round, drilled bead. I used brushed copper puff beads, but you can also use your favorite gemstone beads, flat or round OR even oval shaped.
There are over 150 clear and close up images and 34 steps of detailed instruction to guide you through the project. And certainly, I'm always here for you and welcome your contact if you have any questions along the way.
Have fun with this tutorial and add these unique and beautifully designed earrings to your outstanding collection of wire jewelry skills.
This is an intermediate to advanced tutorial project.
Supplies: All wire is round, dead soft
Two, 10mm, flat, round beads, drilled
Six, 10 inch lengths of 22 gauge wires (frame wires)
Two, 2.5 feet lengths of 30 gauge wires (weaving wires)
Two, 1.5 feet lengths of 30 gauge wires
Two, 3.5 feet lengths of 30 gauge wires
Two, 2.5 inch lengths of 20 gauge wires (earring hook wires)
Tools:
Wire cutters
Round nose pliers
Flat nose pliers
Nylon jaw pliers (optional)
5mm x 5mm grid paper (optional)
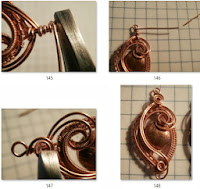

I had quite the time creating this one for you! It's a gorgeous design that can be weaved around any flat round or spherical bead. Once you’re practiced with it, you can easily modify the design slightly and use it for any shape of drilled bead. There are 125 clear and closeup images to guide you through 40 detailed steps. This is a wonderfully challenging project for anyone who loves the art of wire jewelry!
Click here to go directly to the listing
The tutorial uses copper wire, but you can use any type of wire. It is important however, to use the sizes indicated in the supply list. Please feel free to email me if you have difficulty finding the proper size wires. Enjoy! It can be purchased for immediate download in my Etsy store... https://www.etsy.com/shop/PerfectlyTwisted


 Supplies: All wire is round, dead soft
22 gauge wires (frame wires)
30 gauge wires (weaving wire)
One, 1 inch diameter, flat, drilled bead
Tools:
Nylon jaw pliers or flat nose pliers
Round nose pliers
Wire cutters
Supplies: All wire is round, dead soft
22 gauge wires (frame wires)
30 gauge wires (weaving wire)
One, 1 inch diameter, flat, drilled bead
Tools:
Nylon jaw pliers or flat nose pliers
Round nose pliers
Wire cutters


.JPG)
-002.JPG)