Showing posts with label wire wrap. Show all posts

New Beaded and Wire Wrapped Earrings

Okay, I TOLD you I did something more than eat this holiday weekend right??? ;) Click to enlarge any of the images and excuse my poor photography.. I try.

These are a pair of beautiful Chalcedony drops which I strung up with oodles of Iolite chips and silver 1mm beads for some sparkle. They hang just about 2 inches long from the top of the earring hooks to the bottom of the beads. These and all of the new items below, are listed in my Etsy shop now, so please... DO SHOP! :)

These are fun for the holidays which I might be getting into the mood for. Normally, if you can believe...
I'm a 'Bahumbug'. Yes, true. ;)


My fave stones and some of the last that I have. These are some luscious Larimar drops in sterling silver. Hard to see in this image, but the stones are a bit 'deeper' then they appear here. There are four bands of 21g square wire around each of them. One secures the back, two wrap the sides and the first band secures the front of the stone. I'm not sure if I mentioned this for those new to wire, but ... many of us, I'd bet to say even most, secure the stones without adhesives. This is what makes them so wonderful to be hand made. The wire is the only thing holding them in place. To wrap a secure stone and make it attractive to show off the stone is always part of the goal for me. I've only been doing wire wrapped jewelry for the past couple of years off and on. I'm ready to get back into the groove of it and continue my learning. I added a link to JewelryLessons.com which I encourage you to check out! There are many wonderful, affordable tutorials there along with oodles of free tutorials provided by many wonderful artists. I hope to get my tutorial writing skills along with my wire techniques up to snuff enough to contribute there sometime soon. Meantime, mosey over and have a look. OH WAIT, go to my Etsy listing and shop for these amazing earrings first! lol! ;)


Amber's Twist...
Have I ever told you about liquid band aids? The best dang thing you will EVER discover if not. Wire people need this.. it's in the 'ouchy' section of the grocery store. Get the store brand it works just as well as the 'cost more' brand. I know this to be true. :)

Great for when you're a crazy wire worker and even when the fingers are poked, you continue...

Die hards we are!


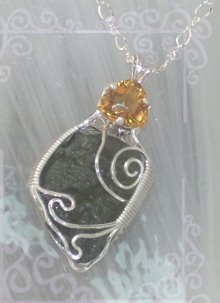
This took hours and hours of loving care... most of these dangle bracelets do but they are so worth the time. I love the way they feel, the beads hanging in such a beautiful cluster at the wrist! I did the wire spirals myself which added all kinds of time to this, but... such as the pleasure of things. The spiral frames are done with hammered 18g sterling wire and then coiled in 26g sterling also. The beads are 1mm sterling silver and there are a mix of bali dangles and a Swarovski clasp. This Baltic Amber has a wonderful 'cognac' color which I think blends quite well with silver. It's a very 'rich' look in my opinion, warm and natural.
I love it.

And then here's something cool about Amber....


Wiki:
As reported by the Ancient Greek philosopher Thales of Miletus around 600 BC, charge (or electricity) could be accumulated by rubbing fur on various substances, such as amber. The Greeks noted that the charged amber buttons could attract light objects such as hair. They also noted that if they rubbed the amber for long enough, they could even get a spark to jump.

Amber can be used to make electricity.... who knew? \@shurgs@/
But I dig that little fact-toid, so I share it. :)


Last but not least...
MAW SIT SIT. I love the name of these stones. The black drops are Onyx, but the wonderful little green ones are called Maw Sit Sit and I love them for the name alone... and then yes, they're most beautiful also. Very similar look to Malachite... sick expensive... at least when I bought them. I hope not so today.

the whole strand of beads are 3 to 6mm beads. The ones that I WANTED that were two strands of 8 and 10 mm beads was... well, a four figure number to the left of the zeros... so I went 'cheap' and got a lovely small strand of them instead. Who has $3400 for a few stands of beads??? I'm convinced it was a typo on their site... but don't know for sure. Was long ago that I bought these and if I can find them again for something reasonable, I'll look to shop for more. Sometimes stones get expensive for a minute because they become popular. Sometimes it's because they're rare. These are more on the rare side.

They are similar in look to Malachite, but are a bit 'glossy-er'. Not for buffing, but there's a deeper or more 'neon' glow or something to the green. I'm not sure the image does them justice. Look em' up... you might enjoy them. If I have some time, I'll add some links here soon.
Mean while - I don't have time just now :)
I have to tend to me store else I make no money to shop for beads with!
Huggles you.
Til next time.
xo

Distractions...
I put this here because I KNOW you can tell how large he is by the count of bins he covers...
My Beast KC (Kitty Cat) in the formal. ;) ~click for a lifesize image... lol. And then there's some tail that you can't even see still! 22lbs of 'I rule the house'...
MAW SIT SIT:
Okay, I'm back... here are a few great reads on Maw Sit Sit...
http://gemologyonline.com/mawsitsit.html
http://www.nordskip.com/mawsitsit.html
http://www.penoir.com/stones/MawSit.html

Here's a quick clip:
Maw-sit-sit is an aggregate of numerous minerals found in the famous jade mining region of Tawmaw in the Himalayan foothills of northwestern Burma. The six main components are:
Chromite, ureyite, chrome-jadeite, symplektite, chrome amphibole, and a matrix of lighter minerals. This material is opaque to translucent with flowing veins of green and black. The matrix is dark green to black in color. Veins that are emerald green to intense neon green have occurred. http://gemologyonline.com/mawsitsit.html

Charoite Sterling Silver Wire Wrapped Earrings


I love this detailed wire wrapping but wow does it take time. I'm using 26 gauge square wire here for the wrap rather than round wire and I'm finding that I enjoy using the square wire more. I think I have more control over the bands and they lay flatter... personal pref on that, but for those new to wire, you'll discover that round wire is great for some applications and square wire for others. There are various gauges and colors and metal types to choose from and you will soon come to find your preferences of wire for the various projects you make. I like to use 18g round wire as frame wire. I normally hammer the wire frame to add strength and I like to use 26g as the banding wire and like I said earlier, the wire used here is square. The silver accent beads are 1mm sterling silver as are the earring hooks.

Tiny wires, many hours... These are deceptive in their simplicity for they took a very long time. I found that when wrapping the frames, it was easier for me to make a few wraps, then take my flat nose pliers and do just a quick 'tap' to make sure they stayed flat and tight.

The center stones are Russian Charoite and the color is natural. Can you believe??? I love this rock and have made many wonderful pieces using it.

Click the image to enlarge and get a close look. The tops of the frames are wrapped in a 'cap' style because I felt it gave a nice look and also provides a place to tuck in the back wires neatly.
When building your jewelry, I always like to advise that you give some visualization to how you might 'finish' ends or where you are going to tuck the ends of wire. If you are working from a tutorial, then this becomes less important and you can make note of how the tutorial finishes the ends. But when making pieces of our own design, I sometimes forget to give thought to this because my eyes are so full the bead candy that I didn't normally give much thought to the finish. Over time, I've learned that it's just as important as the focal point. I've been training myself to think of the findings as part of the whole design and it's become much more now then to just 'add a hook'. I've found that I enjoy creating new ways to close up my pieces and I really like challenging myself to find 'neat' ways to tuck away the wire. It adds a stamp of quality to your project and your piece of wire jewelry, when you or your customer can wear it, without feeling the 'scratch' of a loose end!

Wire Wrapped Earring Tutorial: Beginner: How to Make Spiral Swan Earrings

Here is another little earring tutorial that I hope you enjoy. These don't take that long to make, are pretty simple and make a wonderful pair of earrings. It's a versatile wrap because this can be done with many different types of beads, doesn't require a lot of wire and allows you some room to be creative with either side of the earring. Offering a customer a 'two sided' pair of earrings or a pendant wrapped that way, makes for a bonus reason to buy your jewelry! Plus it allows for you to enjoy both sides of the finished stones. Sometimes, it's hard for me to 'choose the front'. ;)


'Swan Earrings' - This will be the finished project. It'll take you about 20 minutes or 30 minutes. Once you get the hang of this, it'll take you way less. You can make many pair of these in a very short time.

Click any of these images to enlarge.


You'll need:
1. Round nose pliers
2. Flat nose
3. Cutters
4. File
5. Two beads with holes drilled 18 or larger gauge (sometimes a visual will tell you if your wire will fit that hole).
6. Two gold filled, round, soft, 18 gauge wire, cut to 4 inches each.


1. Take the end of a wire with the round nose pliers. Get a firm grip about one quarter inch down the nose of the pliers.

2. Roll the pliers toward you as close against the wire as you can. You want as 'round' a center bend as you can get. But don't sweat it if it's not 'perfect'. That's the charm of hand made jewelry. Just try to be careful not to 'nick' the end.


3. Once you have a nice bend and center loop, gently turn the pliers to create a spiral. Once the first turn is made, it will be easier to get the flat nose pliers and continue the bend.


4. With your flat nose pliers, take the wire firmly but careful not to scratch. Hold onto the loose end close to the plier to maintain control and continue to roll the spiral (about 2 complete turns).

5. In this earring, we are leaving a small 'air space' in between the spiraled wire. This makes room for the earring hook to attach later. It also is a nice affect. In some cases, to add strength, we might have used a hammer to flatten the wire a bit, but in this case, the beads are not heavy and the wire is thicker. These will hold their shape without worry.


6. Once the spiral is complete, thread the bead. You are going to bend the spiral end 'up' to rest on the center of the bead. With your eye, gauge the appropriate distance. Normally, this is just a smidge shorter then the length of the bead. Remember, you can always tighten up that spiral a bit if you need.


7. Hold onto the bead with one hand and at the same the lose end of the wire. Take the spiral with the other hand and push it up and tight against the side of the bead. As an option, you can do this bend using the round nose plier to make the initial curve. I just find that if you can bend around the bead, it makes for a more natural line in the wire, in the part I call the 'neck' of the Swan.


8. Now here before you cut to shorten the end, keep in mind that you have some creative room. In this example, we're just going to make a simple single turn loop to close up and add a small spiral. You can optionally leave that wire longer and create a tight, larger spiral to cover the bead center if you like that look.


9. Using the round nose pliers, put a spiral into the unfinished end. Use the steps above to remember how to spiral. ;)


10. Leave a small amount of 'bending' room in the wire. Bend the spiral up and onto the bead. Do you see how this makes either side of the earrings 'wearable'? If you get the type of ear wires that allow for an open 'S' curve in the end (or you make some), then you have a 'two for one' pair of earrings.


11. Add your ear wires, rub off your finger prints and enjoy!


Thanks for visiting!  IzzyzGumbo@gmail.com

Passion in Purple Amethyst, Sterling Silver, Beaded Bracelet

This little bracelet was so much fun to make but wow... did it take a while. :) Don't they all?

When I found these AAA quality Amethyst briolette beads ... I just had to have them! They are soooo lovely and especially with the Labradorite and Hematite accents. I find these colors go really well together and are soothing to me. I made it 8 inches long on sterling silver chain. I used a sterling clasp, sterling accent beads and headpins also.

My current mood is in the Purples and violets. Check out my Chakra post for information on color energy.

I'm going to take the extra time and try to make a few more of these (I went on a briolette buying spree a while back and picked up a few strands of various fave stones). I have some great Aquamarine and Spinel that I can't wait to wire up!
I splurged and they're all AAA quality and just stunning. These bracelets just take many hours of finger mangle, but they end up worth the whole effort.

I love the way it feels on my wrist too.. I'm such a girl. (winks at you)
But, they're fun to wear... elegant, feminine and even a little mischievous.

I'm working on the earrings but they're not done yet. In the meantime, this is also listed in my Etsy shop if I can dare tempt you... ;)

Click the images to enlarge them.

VIOLET: Thought : "I understand"
Crown chakra, Seventh chakra - located at the top of the head.
Purity, sincerity, clarity, truth, perfection, enlightenment, understanding. Qualities: Perfection, integration / unity with the omnipresent, divine wisdom and purpose, universal consciousness, bliss, understanding, enlightenment.

Terrific Turquoise and Shell Beaded Dangles Bracelet


Yet another finger numbing project, but I love the color of turquoise and golden browns together... why? I dunno, but just look at this bracelet! It's wonderful! Natural, casual, fun. Just the way I love to be. :)

This is 7 inches long, using the most delicious turquoise and shell beads, sterling silver chain, clasp, accent beads and headpins. Earrings are coming! I'm in a bracelet mood the past couple of days so until I get into the ears mood... this will have to tempt you enough.

Click on the image to enlarge.

Delightful Dangles Beaded Wire Chandelier Earrings


Sometimes a girl just wants to whip out a pair of beautiful earrings! So I did. :) These are beaded on gold vermile with bright and wonderful Peridot stones, labradorite chips and gold fill ear wire. I used gold fill wire in the attachment of the stones also. Sometimes it's hard to find applications for really really tiny beads but this was a perfect way to use them I thought. Earrings are a great place for those wonderful tiny stones that might escape attention when strung on a bracelet or necklace with other larger stones.

I put AAA Iolite briolettes in the centers which I thought filled these delightful dangles up with more eye catching color. They're WONDERFUL on the ears.

I had a 'tiny treasures' mood once so I picked up all these wonderful strands of 3mm gemstones and have been itching to use them.

I hope you enjoy these.

VIOLET: Thought : "I understand"
Crown chakra, Seventh chakra - located at the top of the head.
Purity, sincerity, clarity, truth, perfection, enlightenment, understanding

Qualities: Perfection, integration / unity with the omnipresent, divine wisdom and purpose, universal consciousness, bliss, understanding, enlightenment.

GREEN: Air / Touch : "I love"
Heart chakra, Fourth chakra - lies in the middle of the chest.
Warmheartedness, friendship, openness, freedom, harmony, peace, empathy, self renewal.

Qualities: Unconditional / divine love and harmony, forgiveness, healing, compassion, understanding, transformation, warmth, sharing, sincerity, devotion, selflessness.

Kool Kyanite Wire Wrapped Earring Ideas...


To bead a perfect earring is to be a Goddess. *winks*
I love Kyanite and it fails me not, when I make ANYTHING Kyanite, it sells. These are all gone, but I wanted to share a simple and wear with all design for earrings. I wanted to make some nice quality, everyday earrings that carry a subtle 'spectacular' about them, somewhat quick to make and something that I knew would sell. Let's be truthful... we love to make jewelry but how else do we support our bead habits if we don't sell our work!

If you're looking for great sellers and easy making, quality earrings, give Kyanite a shot. Everyone loves it not only for it's beauty, but also for it's energy.

Click to enlarge the image.

BLUE: Ether / Sound : "I speak"
Throat chakra, Fifth chakra - lies at the base of the throat. Faithfulness, loyalty, openness, freedom (light blues), responsibility and respect for others (dark blues)

Qualities: Free / creative self expression, communication, inspiration, confidence, integrity, wisdom, truth, freedom, Independence, access to subtler levels of being.

How to Care for Your Wire Wrapped Jewelry

Updated 2014
The care instructions below are good for all types of jewelry.  The cleaning instructions however, are only intended here to be used for sterling silver jewelry.  Many of my wire jewelry pieces are created with oxidized copper, they are polished to enhance the intricate wire patterns, then a patina sealer is applied to preserve the antique finish.  Using a jewelry cleaner may damage the patina.

The best care you can give your handmade jewelry is to simply NOT wear it when swimming or bathing or during activities that cause perspiration. First things first... the gemstones are NATURAL and therefore can be damaged by chemical reactions. This is why the swimming pool can be so damaging. Chlorine, salt water, perspiration, perfumes... all can cause damage, change of color, staining etc. That's NOT to say, don't wear your jewels to whatever and where ever you want! Just take a moment to realize that a minute or two of care can save your precious pretties from damage and allow you to enjoy them for a long long time. ;)

Some DOs:

* Put your perfume on BEFORE your jewelry. Misting your gemstones and precious metals can damage them over the long run. Besides, if your honey is 'sniffing' behind your ears... it's YOU they want to smell and not the gemstones. ;)

* Store your jewelry in a clean, dry place away from direct sun exposure. Putting your fave earrings on the car dashboard or near a window might cause those pretty gemstones to turn a different color. Putting your jewels in a 'wet or damp' place can cause damage to the metals and stones also.

* After wearing your pretty things out, take them off, wipe them with a clean cloth and store them properly. Either hanging if the wire is 'dangling' like in necklaces or bracelets or in a jewelry drawer laid out. Tangled metal wire on stones can scratch them. Not to mention damage your hand made collectible.

* Here's a fun one... WEAR your silver jewelry! Silver tarnishes and there's not much to do about that, but something you CAN do is enjoy it. Wearing them often will slowly coat the silver with the oils from your skin which will help slow the oxidation process. Wipe your silver with a clean dry cloth and store properly when not wearing. This won't prevent tarnishing totally but will help. Some cleaning recommendations are below.

* Remove your jewelry before you go to bed. Waking up with morning hair is one thing, but can you imagine waking up with knotted gemstone and wire hair! Or heaven forbid... you find the design of your fave earrings imprinted on the side of your cheek! Seriously... wearing your handmade creations to bed can damage them. Take a moment to remove them and at the least, put them on the nightstand.

Keeping your copper jewelry in an airtight bag when you're not wearing them, helps to slow the natural oxidation process.  Most of my copper jewelry, unless stated, has been oxidized and sealed with a professional metal sealant, which protects the finish.

Cleaning your STERLING SILVER handmade collectible jewelry:

I learned much of my wire wrapping techniques from http://www.wire-sculpture.com. They're great to learn from, provide wonderful tutorials and supply great products. I owe Preston and his team a huge smile in gratitude. I hope you enjoy the recipe below. I got it from them, have used it and have found that it works pretty well!
  1. Heat water in the microwave for 1 or 2 minutes.
  2. Cut a piece of aluminum foil that roughly covers the bottom of a small bowl (like a cereal bowl).
  3. Pour hot water into bowl. Place salt, soda, and dish washing liquid into bowl. Place jewelry on top of foil and let it sit for 5 to 10 minutes. Rinse jewelry in cool water and dry jewelry completely with soft cloth. Discard solution after use and make a new batch next time.
  4. According to wire-sculpture.com, "this works well for gold-filled, brass, German (nickel) silver, and sterling silver. I have even cleaned jewelry with freshwater pearls, shell cameos and mother of pearl with no problem.".
  5. If there is a lot of tarnish or dirt on the piece, you can also use an old, soft toothbrush to give it a soft brushing. Rinse the piece and soak for an additional few minutes.


If you don't want to go through all that and would rather purchase a cleaning product, then I can recommend Jewel Brite (Google it, everyone sells it) The link is here:
http://www.jewelbrite.com/products.html

I've used this personally and it's perfectly safe for most jewelry. From the container:

"Safe for pearls, opals, soft stones, costume jewelry and antique jewelry. Contains no ammonia, acid or alcohol. Biodegradable."

It's not that expensive and worth it if you don't like to fiddle around. This cleans them up really nicely, stones and metals. Google up your stones and make sure that the cleaning method is appropriate.

Wire Wrapped Earring Tutorial: Beginner: 5 Minute Earrings

This is one of my most fave pair of earrings and I make them all the time. You can use any type of shell in a tear drop shape for this wrap. I finally got around to taking images while I worked and thought I'd share this one. I hope you enjoy it! :) click the images to enlarge them. And excuse the condition of my workbench, but hey, I'm a TRUE wire bender... and I have scratches. ;)

Needed:
  • Two, 4 inch pieces of 24g, soft, round, sterling silver wire.
  • Two shell teardrop beads.
  • Round nose pliers
  • Wire cutters

Get your round wires threaded through the bead hole until it is about even on both sides and the bead is center the wire.
Bend the wires up with your fingers while hanging on to the bead. bring the wires together and gently squeeze them until they meet.

Rub them out once or so to keep your wire neat and straight after you have them together. Work slowly and deliberately. These are quick, so an extra minute to straighten the wire makes a difference. This is 24 gauge SOFT wire and so bends quite easily. Keeping control over a pair of loose wires makes it more manageable when ready for the pliers. Rubbing the wire out once or twice keeps the tension in it and also 'stiffens' the wire just a bit. Keep that in mind and don't 'over rub' the wire or it becomes a springy mess.


Take your round nose pliers and clamp down on the wires with them as neat and straight as you can get them. The bead 'face' should be facing away from you and the 'side' of the bead should be 'up'. Holding the bead, turn your pliers toward you so that the loose ends bend 'up'. You are making an 'L' shape.

In this position, grab the loose ends with your fingers, letting go of the bead (you have it held by the pliers) and roll the wires around the top of the plier, looping it around and back toward you. You're making a loop around that plier side. See the next image.


After you have your loop, the 'neatest' way to keep it, is to keep the pliers in it. Adjust your grip here if needed and get that loop nice and snug against the pliers. Remember to always maintain 'control' over your wire. If it's feel loosy goosy in your grip, chill out and re-adjust yourself.


Grab the loose ends with your free hand, again wires together and straight and loop around the intersection of wires. Make about three, snug loops going 'down' away from the pliers and toward the bead. Then do three loops back up toward the pliers, layering over the first. I like this affect when using very thing wire because it gives a nice 'substantial' silver top to the earring in a very simple way.


This is what you should have when you're doing wrapping the loose ends. Now using your hands, get your cutters, trim away the ends as close to the loop as you can and to the 'back' side of the earring. Take your flat nose pliers and tuck the sharper tips in the best that you can. Take your time and do gentle tucks. I've slipped with those pliers before tucking ends and have mangled my nice wrap. That wire is soft... always remember to go slow and deliberate (helps reduce unwanted scratches too).

That's it. :) Get a cool sterling silver earring hook, get your earring looped in there, do some cleaning away of finger prints and poof, it's only been 10 minutes and you have a lovely pair of earrings.
Hope you enjoyed this! Thanks for visiting me here.


Email: PerfectlyTwisted@comcast.net
Here's a link to my tutorials only page.