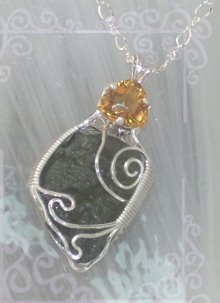
Then I realized... more important than giving exact measurements, is to perhaps, give the 'idea' and thought process behind wrapping an un-drilled stone. So I invite you into my studio during the creation of this pendant... and I'll share 'what I was thinking' while I built it. I'm still a learning student of this art myself... so there might be better ways, but this is one of 'my ways' ;)
When wire wrapping, using a stone or bead WITH a hole makes 'capturing' the stone or bead, fairly easy. You put a wire through the hole somewhere in your design process and wrap around it in a beautiful way. Wrapping a cut cabochon, with no holes, is another matter and requires a different thought process.
The un-drilled cabochon won't stay in place or secure within the wire, unless you're able to build a 'harness' around the stone, all the while, creating a beautiful design and functional bale, in the case of a pendant.
I've put together images hoping to show this process. I don't always have a design in mind to begin with, other than the initial bale I intend to use. Many times that alone, will drive the rest of the creation. Many times, the shape of the stone and any color variations it might have, will also drive the over all design.
Due to their unique shapes, using grid paper helps to keep an eye on symmetry. Even though many of my pendants are more 'free form' than not, there is still a balance to maintain... keeping the stone centered within the pendant for example. Re-aligning your project to grid points will help a great deal, while you work.
I hope these 'tricks and tips' of mine, help you along your creative way!
My other tutorial projects can be found for sale in my Etsy jewelry store. I hope to see you there!
Click each image to enlarge and get a close up. Enjoy!
For stones with odd shapes, use a string, wrapped around the stone, to help measure for wire length needed. For this project, I used four, 20 gauge, sterling silver wires for the frame, cut to 13 inches each.
I used 30 gauge sterling for wrapping wire, in various lengths throughout. Using grid paper helps to keep your stone centered during creation and aids with symmetry throughout the design/creation process.
2

The stone has to be 'captured' from all sides....
'Locking down' wires along the way, helps to keep the pendant harness tight around the stone and the design stable. Needless to say, it's also a matter of added quality, to your finished piece.
While the back side gets a bit 'sacrificed' to secure wire ends, invest the time to keep it as neat and attractive as possible. The back side wires should also be placed with purpose, to ensure that they secure the stone into place and prevent it from 'slipping out'.
Designs in front should be created with the same in mind... they serve a decorative purpose, but also to secure the stone into place.
7

Bringing wires from the back to the front and from the front to the back, in decorative and elegant ways, begins to build the layers of this 'harness', around the stone. Using this type of 'harness', leaves a lot of room for free form creativity.
Wires can be terminated either in the back of the pendant or in the front. Either way, try to secure the end in such a way that it won't catch or shift out of place. Longer lengths might require some type of loop to lock them into place, such as I have done in the image below. Short tight spirals that don't have a long wire length lay much neater against the stone and don't require so much thought about 'catching' and bending out of shape.
While sides might look like they are secure, always 'jiggle' your stone with reasonable pressure to test it. It should not slip out due to being lovingly handled :)
Do this BEFORE you cut away any remaining lengths. You might need to add additional 'design' to secure the stone.
In this case, I created a coil and brought it down the long side of the cabochon.... I'm locking it into place, using the two decorative wires from below.
I create a decorative loop, add a bead and bring the wire back up the front side of the cabochon.
It's locked into place along the back, using an attractive spiral.
The stone can still slip out the top of the pendant... so I use the two remaining wires from above.
Come back for Part 2 and see how this beautiful pendant is finished...
In the meantime, I hope you'll consider to visit my store for some of my other wire projects!
https://www.etsy.com/shop/PerfectlyTwisted
While this project is a 'visual' about design... the tutorials within my store contain all the fine details, including material information, lengths and step by step instructions on how to create these weaving patterns.
All designs and written information are copyright and can not be used to recreate a tutorial by any other party without written consent.


.JPG)
-002.JPG)


5 comments:
Wonderful Tutorial
Thanks Deborah! I love your .com!
I agree, all of your tutorials are great, but this one in particular. Love your blog:)!
Thanks Starseed, love your jewelry!
Thank you so much. Love your designs!
Post a Comment