
I've been hard at work designing a new pendant tutorial for you. I've decided to use a 'donut' stone since they can be found easily and have so much potential for jewelry making! You can get it in my Etsy Jewelry Store... https://www.etsy.com/shop/PerfectlyTwisted
Click here to go straight to the tutorial listing!

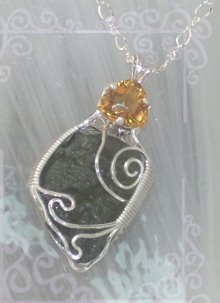
There are two files in this project. The first, primary file, walks you through creating a pendant harness around the stone as well as creating the bale. The 'end result' is what you see in the two images below. The image on the left is the 'front' of the pendant, the one on the right, the 'back' of the pendant. You will learn two different weaving patterns used to create this piece as well as a clever way of creating the bale neck which locks your wires around the stone. The backside will always be clean and as lovely as the front. All wire ends will terminate as a spiral design, so there won't be any 'unsightly' ends anywhere. This will be the base design for many fun and creative variations.


And the second Variations file, will show you exactly that! The file is designed to be 'progressive' and will walk you through adding decorative rounds beads, as well as additional decorative wires. Adding decorative elements will create a more intricate and complex design... yet all the steps are EASY and you'll see that with some imagination, the different styles become limitless.

The first part of the Variations file will show you how to attach decorative round copper beads. Certainly, you can also use stone beads, Swarovski crystals, glass beads and so on!
You can stop here or continue through the Variations file and add decorative wire. There are two different Styles and detailed instructions are included for each.
You can click each image to enlarge for a close up.


A couple sample images from the tutorial...


.JPG)
-002.JPG)


4 comments:
Yummmm Donuts!!! Absolutely gorgeous work Susan! I can't wait to buy this tutorial and make this design too!
yeah!! :)) You're delightful Kelly, thank you so much for this lovely comment and for your business!
Post a Comment