About Apatite and Zincite Crystals and Gemstones
Well, as promised, I've found some time to return to the new pendants and share something about their crystals. I think you'll enjoy the information and I thank the sources for their information. Please visit my etsy if I temp you! ;)
UPdated... these pendants have both been sold...
Meet.... Apatite and Zincite:
Perhaps this doesn't look like a Koi to you, but I assure you She is... all 'coi'. ;)
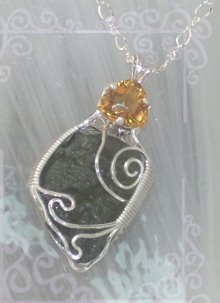
Sterling silver wire and beads surround the most amazing Neon Apatite and Zincite crystals! Intricate wire details and design make this a truly one of kind piece. The frame is 18g sterling silver wire with 24g and smaller in accents. A mix of 1mm and larger sterling silver beads are woven in and surround two Neon Apatite rough gemstones. They're stunning in color and AAA quality. A small but outstanding crystal of rare Zincite is tucked in along with a couple of peacock blue freshwater pearls.
Koi: Koi, or Carp, are a fixture of Japanese culture and art and play important roles in both Chinese and Japanese myths, legends, fables and stories. In many of those stories, Koi are transformed through their efforts and perseverance, able to climb waterfalls or become dragons. The Koi fish represents perseverance in the face of adversity and strength of character or purpose. The Carp also represents wisdom, knowledge, longevity, and loyalty.
The 'story' of Apatite:
The name is derived from the Greek apatao, meaning "I am mistaken," because for a long time, it was confused with other stones. It is often confused with Aquamarine and Beryl which are both harder then Apatite. Apatite was not yet known in ancient mythology, it's often fascinating strong blue color only became famous in modern times. It also exists in white, yellow, green and orange. Apatite is said to encourage intuition during meditation and can stimulate memories of the past. When placed on the throat chakra, apatite produces a feeling of warmth and harmony and helps in overcoming problems.
~Healing Crystals and Gemstones From Amethyst to Zircon
ISBN 1-56852-442-0
Apatite is associated to Aquarius.
It belongs to the family of phosphate minerals.
Hardness 5
Found in Sri Lanka, Burma, India, Canada, Mexico, Brazil
I chose these gemstone for this Koi because of all the symbolism involved. "I am mistaken" ... one does not have to be 'hard' at heart, harsh in voice or tough in thought and action to create transformation and change. A 'new' form of individual thought patterns can create a better world, full of hope, harmony and wisdom. I chose Zincite to accompany the Apatite because it requires 'the fusion of man made and Natural' efforts to exist. Rare when such a unity can come together in the creation of such beauty.
Our human efforts to exist within ourselves, within our technologies, moving forward in personal evolution, while still honoring our past... in itself, is a rare blend of our being. We are each a 'drop in the sea'... and yet the sea can not exist without 'us'. We are humbled in Nature and yet Nature can not be 'grand' without 'us'. We are as rare, miraculous and special as any of the gemstones I use in Creation.
And as glorious science would tell us... we ARE, the gemstone.
~So enjoy Ourselves, as a Magical Koi~
~Slip away... between the the mesh~
~A fusion of life, endeared to the chest~
I thank the sources for the shared information and encourage your visit to their sites for further learning about these rare crystals...
The story of Zincite:
Borrowed from http://www.towercrystals.com/zincite/index.html
Zincite crystals of this caliber only come from the Zinc smelters of Poland. Red Zincite Crystals are the most sought and are getting very scarce. The naturally occurring conditions necessary to grow these crystals were created inside of zinc smelters so they are a fusion of natural and man made. Zincite crystals are no longer being produced due to changes in the smelting process. Some of the green and blue specimens actually will fluoresce under a black light.
Borrowed from: http://www.man.li/zincite.htm
Zincite can activate the lower chakra. This mineral provides help for synthesis of personal power, creativity and physical energies. Since our Zincite Crystals crystallised from the gaseous (fire) state directly to the solid state without ever becoming a liquid (unlike 99,9% of all other minerals which have been at some stage liquids in their thermal history). Since fire is the cognition of the transformation of the hard-physical to the hard spiritual, red Zincite getting big importance in our time of collective transformation into the cosmic Aquarian age .
The metaphor of a zincite crystal is that out of all the tragic, all the devastation and trauma something beautiful, valuable and desirable emerges! All that occurs follows a way and what happens follows a higher goal.
~ This piece of rare zincite is 'falling through' the 'Meme'brain'... and I won't explain why I named it what I did..., just know that it's all about creating new Uni-Verses. ;) Sharing ourselves in new ways with new patterns for growth, prosperity and social interactions. Best of all... it's all about the culmination of the human spirit into the 'greatest time' that human-kind will ever engage. We are re-discovering ourSelves....
Thanks for visiting Perfectly Twisted Jewelry!
Please contact me with comments or questions!
IzzyzGumbo@gmail.com
Tutorial Beginner: How To Create a Twisted Wire For Wire-Wrapping Jewelry, Using a Pin Vice
Most wire wrapping projects use either square or round wire. There are many techniques which can be applied to the wire before the wrapping process. One of them is to add a 'twisted' or filigree look to square wire. This is a short, free tutorial on how to create a twisted wire to use for your wire wrapping projects. Click on any of the images for a closeup view of the tools and wire used.
This is a pin vice.
There are a few ways to create a twisted look to square wire. The old fashion way is shown here and best used for 'smaller' projects. If you are twisting a foot or two of wire, this method is good to use, but if you are twisting many many feet of wire, then an alternative would be to use a drill head or similar type tool. In this tutorial, we are using a Pin Vice and flat nose pliers.
The pin vice I'm using is two sided and each 'bit' is designed for certain gauge wires. The most common gauges for wire wrapping jewelry are 21 or 22 gauge, dead soft wire, either square or round and 'half' round banding wire. The pin vice I have will work with most wire from 24g to a larger 18 gauge wire. If you are purchasing a Pin Vice or Pin Vice set, make sure that you get the tool appropriate for the gauges you work with.
1. To create a twisted look, you are best to begin with square wire. I normally use what's called Dead Soft wire. It's easier to work with when wire sculpting or wrapping then 'hard wire' is.
Twisting the wire will create more strength in the wire also.
2. The 'tools' used are flat head pliers and a wire twisting tool called a Pin Vice. As shown in the image, the wire slips through the pin vice and is held in place by screwing the head 'closed' around the wire. Working with 2 or three inches at a time is best.
3. Use your pliers, clamp down and hold the 'end of the wire. Holding the vice with your other hand, begin to manually turn the tool either toward you or away from you. Keep the twisting as consistent as you can. Count them per the 2 or three inches you are working with. The more you twist, the tighter the look.
4. After you have the desired 'look' for 2 or 3 inches, stop, loosen the vice, slide it back along the square wire, exposing another 2 or 3 inches of untwisted wire. Tighten the vice and move the teeth of your flat nose pliers to hold the wire now, at the intersection of the previously twisted wire section and the section to be twisted. Begin the manual twisting process again.
5. Continue these steps until all the wire length is twisted. You will notice that the new wire has much more strength to it then the previously untwisted wire. This technique adds a great look to wire projects but is also great to use when building bails. If your project is small and you are using thin, soft wire and need to add strength to the bail, the twisting method works quite well.
Pin Vices are not that expensive and can be found at most jewelry supply shops. I think I remember purchasing mine from Wire-Sculptor.com for less then $15.00
In one of the tutorial videos I've studied in the past, I also saw a technique where twisting could be done with an electric hand drill and pliers. The same concept applies. Make sure you hold onto the loose end of the wire tightly in your pliers, using a small hand drill as the 'vice', clamp down on the end of the wire and close the bit around it. Then turn the drill 'on' or using a finger trigger, begin the drill head on 'slow'. It will start to twist your wire at a pretty decent speed.
Enjoy! I hope this helps you get started with Twisting Wire.
New Beaded and Wire Wrapped Earrings
Okay, I TOLD you I did something more than eat this holiday weekend right??? ;) Click to enlarge any of the images and excuse my poor photography.. I try.
These are a pair of beautiful Chalcedony drops which I strung up with oodles of Iolite chips and silver 1mm beads for some sparkle. They hang just about 2 inches long from the top of the earring hooks to the bottom of the beads. These and all of the new items below, are listed in my Etsy shop now, so please... DO SHOP! :)
These are fun for the holidays which I might be getting into the mood for. Normally, if you can believe...
I'm a 'Bahumbug'. Yes, true. ;)
My fave stones and some of the last that I have. These are some luscious Larimar drops in sterling silver. Hard to see in this image, but the stones are a bit 'deeper' then they appear here. There are four bands of 21g square wire around each of them. One secures the back, two wrap the sides and the first band secures the front of the stone. I'm not sure if I mentioned this for those new to wire, but ... many of us, I'd bet to say even most, secure the stones without adhesives. This is what makes them so wonderful to be hand made. The wire is the only thing holding them in place. To wrap a secure stone and make it attractive to show off the stone is always part of the goal for me. I've only been doing wire wrapped jewelry for the past couple of years off and on. I'm ready to get back into the groove of it and continue my learning. I added a link to JewelryLessons.com which I encourage you to check out! There are many wonderful, affordable tutorials there along with oodles of free tutorials provided by many wonderful artists. I hope to get my tutorial writing skills along with my wire techniques up to snuff enough to contribute there sometime soon. Meantime, mosey over and have a look. OH WAIT, go to my Etsy listing and shop for these amazing earrings first! lol! ;)
Amber's Twist...
Have I ever told you about liquid band aids? The best dang thing you will EVER discover if not. Wire people need this.. it's in the 'ouchy' section of the grocery store. Get the store brand it works just as well as the 'cost more' brand. I know this to be true. :)
Great for when you're a crazy wire worker and even when the fingers are poked, you continue...
Die hards we are!
This took hours and hours of loving care... most of these dangle bracelets do but they are so worth the time. I love the way they feel, the beads hanging in such a beautiful cluster at the wrist! I did the wire spirals myself which added all kinds of time to this, but... such as the pleasure of things. The spiral frames are done with hammered 18g sterling wire and then coiled in 26g sterling also. The beads are 1mm sterling silver and there are a mix of bali dangles and a Swarovski clasp. This Baltic Amber has a wonderful 'cognac' color which I think blends quite well with silver. It's a very 'rich' look in my opinion, warm and natural.
I love it.
And then here's something cool about Amber....
Wiki:
As reported by the Ancient Greek philosopher Thales of Miletus around 600 BC, charge (or electricity) could be accumulated by rubbing fur on various substances, such as amber. The Greeks noted that the charged amber buttons could attract light objects such as hair. They also noted that if they rubbed the amber for long enough, they could even get a spark to jump.
Amber can be used to make electricity.... who knew? \@shurgs@/
But I dig that little fact-toid, so I share it. :)
Last but not least...
MAW SIT SIT. I love the name of these stones. The black drops are Onyx, but the wonderful little green ones are called Maw Sit Sit and I love them for the name alone... and then yes, they're most beautiful also. Very similar look to Malachite... sick expensive... at least when I bought them. I hope not so today.
the whole strand of beads are 3 to 6mm beads. The ones that I WANTED that were two strands of 8 and 10 mm beads was... well, a four figure number to the left of the zeros... so I went 'cheap' and got a lovely small strand of them instead. Who has $3400 for a few stands of beads??? I'm convinced it was a typo on their site... but don't know for sure. Was long ago that I bought these and if I can find them again for something reasonable, I'll look to shop for more. Sometimes stones get expensive for a minute because they become popular. Sometimes it's because they're rare. These are more on the rare side.
They are similar in look to Malachite, but are a bit 'glossy-er'. Not for buffing, but there's a deeper or more 'neon' glow or something to the green. I'm not sure the image does them justice. Look em' up... you might enjoy them. If I have some time, I'll add some links here soon.
Mean while - I don't have time just now :)
I have to tend to me store else I make no money to shop for beads with!
Huggles you.
Til next time.
xo
Distractions...
I put this here because I KNOW you can tell how large he is by the count of bins he covers...
My Beast KC (Kitty Cat) in the formal. ;) ~click for a lifesize image... lol. And then there's some tail that you can't even see still! 22lbs of 'I rule the house'...
MAW SIT SIT:
Okay, I'm back... here are a few great reads on Maw Sit Sit...
http://gemologyonline.com/mawsitsit.html
http://www.nordskip.com/mawsitsit.html
http://www.penoir.com/stones/MawSit.html
Here's a quick clip:
Maw-sit-sit is an aggregate of numerous minerals found in the famous jade mining region of Tawmaw in the Himalayan foothills of northwestern Burma. The six main components are:
Chromite, ureyite, chrome-jadeite, symplektite, chrome amphibole, and a matrix of lighter minerals. This material is opaque to translucent with flowing veins of green and black. The matrix is dark green to black in color. Veins that are emerald green to intense neon green have occurred. http://gemologyonline.com/mawsitsit.html
Subscribe to:
Posts (Atom)