As requested! The fabulous five are now offered together in one extraordinary bundle! This is an $11.48 savings if purchased through this bundle vs individually.
Click here to go straight to the store listing!
Bundle price is $42.24
You'll have hours of challenging fun applying your wire skills to these projects! You'll learn versatile and beautiful jewelry designs which can be used for unique gifts or to sell in your jewelry store! There are hundreds of clear and close up images with detailed instruction through out every project.
This bundle offers everything you might want to add to your already unique and beautiful collection of handmade jewelry projects! While the tutorial content is copyrighted and not redistributable in tutorial form, you CAN use any of these designs for resale in actual jewelry form. So have fun expanding your wire jewelry offerings or take your 'hobby' to the next level and use these designs to open up shop!
My passion is to share this amazing art form and I work feverishly to create new and eye catching designs, so please keep checking back with my tutorial catalog!
https://www.etsy.com/shop/PerfectlyTwisted?section_id=10423914
These projects are intermediate to advanced.
The wire sizes needed are:
12 gauge
20 gauge
22 gauge
26 gauge
28 gauge
30 gauge
All wires are Round, Dead Soft
Bead sizes range per project and are described in each individual supply list. Or you are welcome to check the supply list on the individual listings which can be found in my Tutorials Categoryhttps://www.etsy.com/shop/PerfectlyTwisted?section_id=10423914
All of these files are instant downloads and can be saved to your computer, after purchase, by pressing the DOWNLOAD buttons from the Order page.
I'm here for you too, so if you have any questions or need advice on finding supplies, feel free to email me any time.
Showing posts with label beaded jewelry. Show all posts
Featured Artist, Deco-Artwork, Handmade Jewelry by Cindy Lodge
It's my pleasure to introduce you to my friend Cindy. She is the owner and artist creator of Deco-Artwork Jewelry and I encourage you to visit her Etsy store! The direct link is here...
https://www.etsy.com/shop/DecoArtworkJewelry
She specializes in vintage style necklaces, earrings and bracelets as well as wire wrapped and sculpted jewelry. She is brilliant in combining quality gemstones and beads to create unique and beautifully designed pieces and welcomes your custom orders! Enjoy a sample of her work below and visit her shop to see more of these delicious creations! Click the item title to go directly to her store listing.
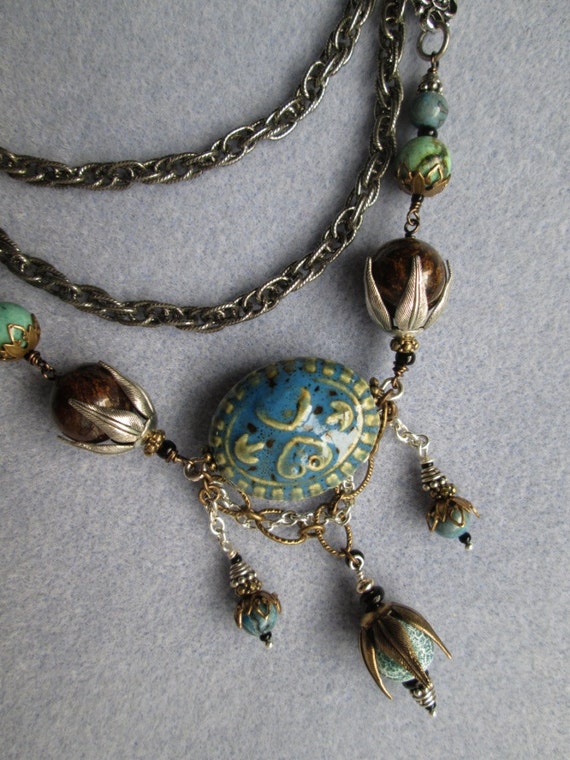
Triple Chain Necklace with Blue Green Beads and Vintage Ceramic Focal Bead, Mixed Metals
https://www.etsy.com/shop/DecoArtworkJewelry
She specializes in vintage style necklaces, earrings and bracelets as well as wire wrapped and sculpted jewelry. She is brilliant in combining quality gemstones and beads to create unique and beautifully designed pieces and welcomes your custom orders! Enjoy a sample of her work below and visit her shop to see more of these delicious creations! Click the item title to go directly to her store listing.
Triple Chain Necklace with Blue Green Beads and Vintage Ceramic Focal Bead, Mixed Metals
- Materials: Bronzite brown beads, Blue Laguna Lace Agate Beads, Green efluoresent agate bead, oxidized silver chain, oxidized brass chain, Antique brass lobster clasp, Large vintage ceramic bead, Vintage blue green and yellow oval bead, Rose leaf bead capps, Filigree bead caps, Black seed beads, Silver plated ball head pins, silver filled wire loops.
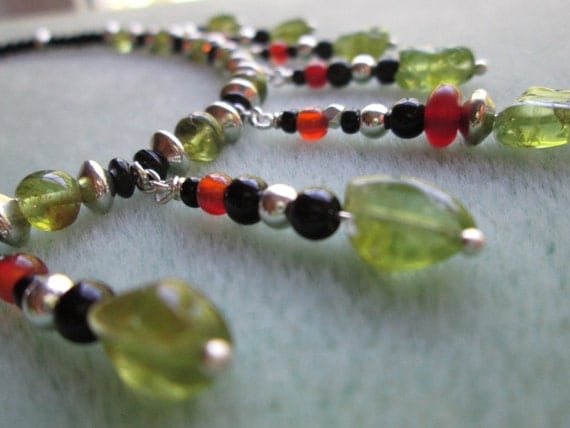
Necklace Fringed with Peridot, Onyx, Silver and Red Carnelian Pickapeppa
- Materials: Peridot Nuggets, Peridot Round Beads, Black Onyx Beads, Silver Plated Beads, Red Carnelian Beads, Handmade Dangles, Handmade Fringes, 12 mm Oxidized Silver Clasp, Silver Plated Chain, Silver Plated French Wire
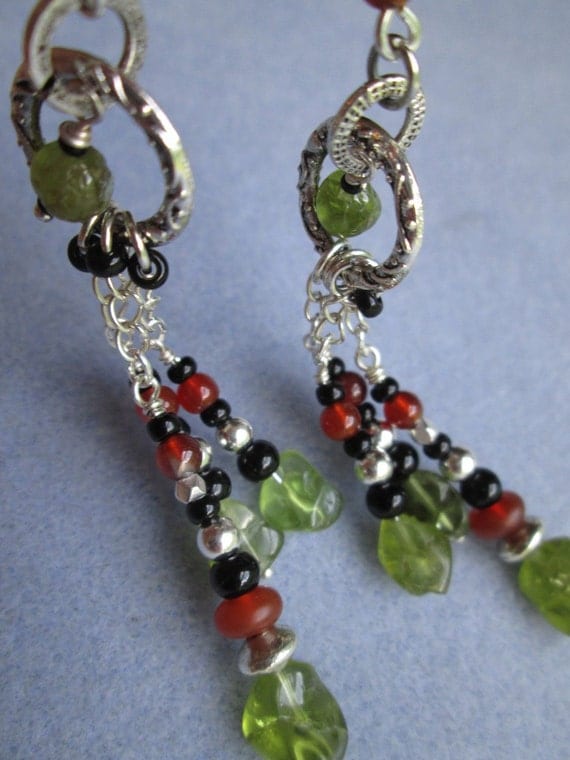
- Materials: Sterling Silver Chain, Green Peridot Nuggets, Green Peridot, Beads, Black Onyx Beads, Shiny Silver Beads, Orange Red Carnelian Beads, Silver Plated Ball Headpins, Handmade Silver Filled Ear Wires, Beaded and Coiled Ear Wires, Jet Black Glass Seed Beads
New! Wired to Love You, Copper and Bronze Wire Pendants
So it's finally done! I'm really happy with how the patina turned out along with the whole piece. I also put a patina to the copper chain as well as the clasp. I decided that a machine made clasp wasn't going to 'do it' for this beautiful pendant, so I designed my own. Wired into the heart are Garnet and Spinel briolettes and rondelles as well as accent copper beads. I loved making this piece and it's perfectly on time for the upcoming Valentine's day. Enjoy the eye candy, I just posted these pieces into my etsy store!
http://www.etsy.com/shop/PerfectlyTwisted
Click each image to enlarge and feel free to email me at IzzyzGumbo@gmail.com for questions.
.JPG)
Gems Medley
Copper wire, oxidized, buffed and sealed to keep the gorgeous antique finish. Iolite, amethyst, peridot, spinel gemstones and copper beads.
.JPG)
-004.JPG)
.JPG)
The Mystic's Eye
Bronze wire, handmade love knots, glass pearl and focal beads.
http://www.etsy.com/shop/PerfectlyTwisted
Click each image to enlarge and feel free to email me at IzzyzGumbo@gmail.com for questions.
Gems Medley
Copper wire, oxidized, buffed and sealed to keep the gorgeous antique finish. Iolite, amethyst, peridot, spinel gemstones and copper beads.
The Mystic's Eye
Bronze wire, handmade love knots, glass pearl and focal beads.
Copper and Sterling Silver Wire Wrapped Jewelry In the Making...


Well good morning again everyone! There's fresh coffee, tea, sugars and honey on the table. ;)
I've been head down this week working on a few things. One of them being learning about copper. I'll have a good article posted with links to a few sites and some information I found soon. I'm 'composing' while I create and learn. For now, I wanted to share some images of a couple new copper projects in the works. I have yet to finish earrings and such for these sets but by this weekend, they should be posted.
I find that copper is amazing with turquoise and finally, I have found a way to use the wonderful beads I purchased last year at Magpie Gemstones. The little focal 'Goddess face' there is porcelain and I also purchased this from Magpie. I'm afraid I don't remember the designers name, but I purchased three of these focals from Szarka last year and just love them. I'm glad I found copper to use with them. Check out her beads - amazing quality and the price was outstanding. I have to admit that I've used turquoise before, but didn't 'love it' until I got these strands. I also have some of her focal bone pieces which are outstanding and have waited to find the right application for them. I think copper is going to be perfect and those images are also, coming soon.
Thanks to Magpie! http://www.magpiegemstones.com/home.html
These images are sold but I hope they give you some great ideas. The bone beads, turquoise and porcelain focals are from Magpie. The first image below to the left... those beads are called Pietersite and they're an amazing blend of browns, tans and red colors. I think they all worked very well in copper. :) Enjoy!


These are some additional things in the works... just so you know I'm still here. :)


(the aqua aura pendant is listed. Click image to go there)Okay everyone - back soon - many hugs!
Thanks for visiting Perfectly Twisted Jewelry! Please contact me with comments or questions!
IzzyzGumbo@gmail.com
twitter.com/izzygumbo
Mystery Beads.... and Copper


I love the look of these beads with the copper and leather. My family brought them back from Mexico last year for me, but unfortunately, we've misplaced the name of the beads! They almost seem as though they are a clay of some type because the drill hole seems like a chalk or hardened clay, but... we were told they are stones of some kind. If you have any idea what these might be, I'd really appreciate the information. I've been searching for a while, but haven't found anything even close.
I hammered these copper pieces and then used a mixed color of copper to accent the metal. The necklace is meant to be worn close to the neck like a choker. I think, having chatted with some of you now on this, I might call them Artistic Beads if I can't identify them as a natural stone. They are just beautiful and I hope the images do them some justice.
Again - any further help with the beads would be great, if you recognize them!
Many hugs.
Thanks for visiting Perfectly Twisted Jewelry! Please contact me with comments or questions!
IzzyzGumbo@gmail.com
Featured Artist! ChezChani
ChezChani is a wonderful shop full of bright, beautiful and unique designs. Roz and Elayne, a mother daughter team, create stunning works of glass, wire and finely beaded jewelry. They reside in the fabulous city of Las Vegas NV and reflect the fun and adventurous nature of that city in some of their jewelry designs. I absolutely love the playing card earrings and the Peyote stitch is mesmerizing in this black and white patterned bracelet.
Visit them and their outstanding art! Click any of the images to visit.
Thanks for visiting Perfectly Twisted Jewelry! Please contact me with comments or questions!
IzzyzGumbo@gmail.com
What Is Wire Wrapped and Beaded Jewelry?
The art of making jewelry using stones and natural materials from the earth, spans back thousands of years. Wire wrapping is one of the oldest techniques used to create jewelry and can be dated back to the years of BC. Samples from the Sumerian Dynasty and Ancient Rome show that they were using wired loops and wire techniques over 2000 years ago. The ancient Egyptian goldsmiths were credited as the first craftspeople to produce jewelry entirely from wire approximately 4000 years ago. The Vikings were knitting their wire into jewelry and making chains of metal wire.
The technique of wire wrapping specifically, normally does not include the use of soldering or adhesives to keep the stones in place or the wires together. The design in the wire and the placement of the stones within that, are the art of securing the stones in place to create a beautiful piece of unique jewelry. Patterns joining round ‘links’ or beads create unique and intricate designs that can sometimes even resemble or function as ‘fabric’. Chainmaille is one such example of this, in its most complex forms. Stitching with beads is another and sometimes known as 'seed beading'.
When creating wire jewelry, all forms of drilled beads, loose rough rocks, polished cabochons, crystals and gemstones can be used. This includes other natural beads such as seeds, shells, wood, paper, blown glass and clay of various kinds. Corals, fossils, meteorites and synthetic stones included. This is part of what makes this art limitless. Many artists mix metals, wire sizes and types. Some include sheet metal designs, precious metal clay elements and even fabric.
Wire doesn’t stop at jewelry however. Many artists extend their designs into the home, beading lampshades, pillows, creating wire elements for the dinning table such as beaded napkin holders, candles sticks and wine glass markers. Drink stir sticks and hair decorations are other fun projects!
Not to mention… all of this as applied to weddings and other special occasion.
There is a magical peace and joy that come with this art. To sit quietly with Earth’s elements, your imagination, your hands, some simple tools… and to challenge your mind into bringing those things together as an expression of yourself is something… almost indescribable.
I hope this inspires you when you shop for gifts, when you sit to create for your family or loved ones and when you consider ‘what to do next’ to creatively express yourself.
~Please see the links on my side bar to visit some outstanding artists and their creations! Thank you for visiting me also. :)
Blessings and Peace.
Click the images to visit each amazing artist. Visit the links on my side bar too! Many artists, sharing, caring, learning, creating and exploring. :) Welcome!
eSMArt Team Store
Thanks for visiting Perfectly Twisted Jewelry! Please contact me with comments or questions!
IzzyzGumbo@gmail.com
Charoite Sterling Silver Wire Wrapped Earrings

I love this detailed wire wrapping but wow does it take time. I'm using 26 gauge square wire here for the wrap rather than round wire and I'm finding that I enjoy using the square wire more. I think I have more control over the bands and they lay flatter... personal pref on that, but for those new to wire, you'll discover that round wire is great for some applications and square wire for others. There are various gauges and colors and metal types to choose from and you will soon come to find your preferences of wire for the various projects you make. I like to use 18g round wire as frame wire. I normally hammer the wire frame to add strength and I like to use 26g as the banding wire and like I said earlier, the wire used here is square. The silver accent beads are 1mm sterling silver as are the earring hooks.
Tiny wires, many hours... These are deceptive in their simplicity for they took a very long time. I found that when wrapping the frames, it was easier for me to make a few wraps, then take my flat nose pliers and do just a quick 'tap' to make sure they stayed flat and tight.
The center stones are Russian Charoite and the color is natural. Can you believe??? I love this rock and have made many wonderful pieces using it.
Click the image to enlarge and get a close look. The tops of the frames are wrapped in a 'cap' style because I felt it gave a nice look and also provides a place to tuck in the back wires neatly.
When building your jewelry, I always like to advise that you give some visualization to how you might 'finish' ends or where you are going to tuck the ends of wire. If you are working from a tutorial, then this becomes less important and you can make note of how the tutorial finishes the ends. But when making pieces of our own design, I sometimes forget to give thought to this because my eyes are so full the bead candy that I didn't normally give much thought to the finish. Over time, I've learned that it's just as important as the focal point. I've been training myself to think of the findings as part of the whole design and it's become much more now then to just 'add a hook'. I've found that I enjoy creating new ways to close up my pieces and I really like challenging myself to find 'neat' ways to tuck away the wire. It adds a stamp of quality to your project and your piece of wire jewelry, when you or your customer can wear it, without feeling the 'scratch' of a loose end!
Labels:
beaded jewelry,
charoite,
earrings,
sterling silver,
wire wrap,
wire wrapping
Wire Wrapping Tutorial: Beginner: How to Make Beaded and Crystal Wire Hair Spirals

This one is really fun and very easy to do. They are completely decorative so don't expect them to actually hold any hair. These add decoration to the hair, a little sparkle, a little pearl, a little crystal... great for party hair or wedding hair or just fun to make with the girls. You wear them by 'twisting' them into a lock of hair. This is an amazing look to decorate an 'up'-do for a wedding or night out. These are small, so you wear several of them, strategically placed for desired hair blinging. Great to sparkle up braids also. Enjoy!
It's a basic, very wide spiral, using a thick gauge wire and adding some fun beads. Click the images to enlarge.
You Need:1. Round nose pliers
2. Flat nose
3. File
4. Cutters
5. 4 inch long, round, 18 gauge, soft wire. (hard is fine too)
***You'll need one wire per each of these you want to make.
6. 1 foot of 26g, sterling, round, soft wire.
7. 1 foot of 28g, sterling, round, soft wire.
8. A bunch of small, fave beads, 3 to 5mm.
1. After you cut your wires, be sure to file the ends to get the rough edges off.2. Then using your round nose plier, create a loop at one end.
Preview: You can create the spiral first and then attach the beads, or you can leave the wire straight and create the spiral as you go. Take a look at the images ahead and get an idea of what will work best for your design.In this project, I am coiling around the gold, so this for me, is easier to do before I spiral the gold.
4. After creating the first loop, anchor a 6mm Swarovski crystal (or your fave bead) to it using the 26g silver wire.For something that's going to be in hair, something that catches the light and gives a little sparkle is nice. Wrapping the gold fill wire with silver adds to this also.
5. To anchor the bead: Make a bend in your 26g sterling wire, one inch from the end, bringing the short end together with the long end. Thread the entire wire through the center of the bead. The loop made by the wires coming together will form a 'kink' at the end of the bead and keep it from passing through. Anchor it to the gold loop by wrapping with the short end of the silver wire.
6. Using the long end of the wire, coil around the gold in a consistent and even wrap. Stay close and tight to the gold and coil until you are about 2 inches from the other end. Make sure to tap the end of the silver wrap with a flat nose so that it's not sticking out. Taking a minute to tuck the ends in, makes always for a nicer project.
7. Using the 28g sterling wire now, anchor it to gold loop under your bead. Make a couple of tight wraps and then add a 1mm silver bead. Make a couple of tight wraps, moving 'forward' and add another bead. Work like this until you add as many as you like. In this case, I added 11 of the 1mm sterling beads.
8. Thread a 4mm crystal bead and begin to move in the opposite direction, back toward the spiral center. Add another 4mm crystal, wrapping around the main wire to anchor each time.9. Add a couple of pearls or some other silver beads or some seed beads... have fun with it.
10. I added two small freshwater pears and then finished it up by anchoring the end of the wrap wire under the main center bead. Neat and clean.11. Take your round nose and create a loop at the unfinished end of the wire. Gently 'pull' and create a spiral by moving around the center cluster. Adjust with your hands until you get a neat spiral.
12. Push the bead cluster forward just slightly from the end. The next image shows the finished project.
That's it... Twist into a lock of hair and be beautiful. :) Make many of these in fun ways using many types of wire and beads. I used gold and silver but you can use craft wires and copper for more casual hair wear.
Enjoy! Thanks for visiting here.

Wire Wrap Earrings Tutorial: InterMed: How To Make Three Spirals, Wire Earrings

These might take a time or two. They're great to use for anything but perhaps the spirals take some practice. I'd recommend craft wire until you get the feel of it. Otherwise, this is my THIRD tutorial! Hooraaay! I hope you enjoy them.The finished project are the wire spirals in that photo. Useful for earrings of many fun kinds!
Click on any of the images to enlarge.
You'll Need:1. Round nose pliers
2. Flat nose
3. File
4. Cutters
5. 2 Gold Fill ear hooks
6. 2, 18 gauge, soft, round, gold fill wires, cut to 6 inches each.
1. After your wires are cut from the spool, get them as straight as you can by rubbing them once or twice. This will also add a bit of tension to the wire.2. File the ends a time or two to smooth the cut end.
3. Take the round nose pliers and create a bend about 1.5 inches down one side of the wire.
4. Then using your round nose plier, grab the end of the wire and create a tight spiral, moving in the opposite direction as your first bend. Pause and see the next image.
5. This is what you should have. Creating your spiral in this direction creates a nice natural soft "S" shape to the wire. You will create about 2 full turns. This will be tightened up later so don't sweat it.
6. Remove the pliers from the loop and grab the loose end of the wire about 3/4 inches down from the loop intersection.7. Grab the wire with the 'small' end of the plier and create a tight loop, over lapping the wire on the 'top'. Click that image to enlarge and get a good look. Bring the wire around, the best that you can. This is where you might have to muscle it a bit. You are going to create another spiral above the 3/4 inch straight part. This requires that you wrap this wire above it. Once you get the first bend around the center loop, it will be easier to get your flat nose pliers and continue the spiral. See the next image for a glance ahead.
8. Continue to spiral three complete turns and the spiral will grow to almost meet the first one.9. Once the second spiral is created, take the round nose pliers and grab the top of the loose end. You're about to make the final spiral.
10. Create this spiral moving in the opposite direction as the second one. You are creating the shape of an "S" in between them. Use your flat nose pliers and gently continue that spiral until you meet the intersection of the first two. This will require a little muscle also and patience. You need a firm grip, but gentle enough to not scratch your wire. Take your time and manage control over the shape. Adjust your loop and first spiral as you go. the goal is to create a 'threesome' as evenly as you can.
11. This will be the finished set. Here's a word of forward thinking... when making earrings, and especially so with wire spirals... keep in mind that one earring goes in 'one direction' and the bends of the other, go in the other direction.It's not harmful if you make two pair the same, or if the spirals are a little off...it's the charm of handmade... but it is something to be aware of.
Now, I didn't 'finish' these because I wanted you to see how many things are possible with this simple design. Click to enlarge that image. I show the backside on the left and the front of the earring is the one on the right. You have a small intersection where you can attach all kinds of fun beads.You can put a small chain of three or four links on these, string up a number of these beads and create a few different looks. You can also use this technique by using longer wire and adding a couple more turns in the spirals, to create a pendant to match the earrings. Adding a couple more turns will create a slightly larger version of these earrings. Nice for a matched set. Remember that you have that 'straight spine to the back of the earring to attach anything you need. I made these loops at the earring tops larger because I like to wrap with a silver half round wire, but you can optionally make that loop smaller, the spirals larger... have fun with it and try different things for your own look. I'm hoping that this simple multi-spiral project will give you something versatile to play with!
I'll post mine when I get them done. This looks great in silver wire also! Something I like to do with earrings lately is mix the metals. I think the larger gold wire accented with silver half round is cool look. I think that's what I'm going to do...
Have fun and thanks for visiting here! Now I have to remove my beast and finish my earrings. You see why I can be so disorganized? Half my beads leave the table in between her toe nails.... sheesh!


~ Okay, here are my finished pair. I added some half round silver wire in 21 gauge to the top to give some substance and shine there. Then using the back spine and some thin silver wire, attached these two AAA 8mm, Iolite, briolette beads.... ooolala! I hope this project gives you some wonderful ideas!
~ Polish off the paw prints, put into a cute white bowl (yes that's what my 'background' is), get some photos ... and poof! Another wonderful pair of earrings ready for holidays or any daze! ;)
Enjoy and have fun with these.
Subscribe to:
Posts (Atom)