Showing posts with label Making jewelry. Show all posts

Getting Started - Before you get started making wire wrapped jewelry...

I get many emails asking what it takes to get started in this beautiful art form.  That's much more of a loaded question than one might realize as this art form, is about as endless as imagination itself.  :))

Having said that, I've decided to give a post on what I consider to be the very basics and how to figure out exactly where that 'start point' might be.

First, I'll give you the 'short cut', do it now, impulse driven, dive in method and then I'll describe the details of what it will take when you decide you're sticking with it.

It can be expensive to just dive in, considering there are tons of different tools that can be needed, depending on what type of jewelry you're interested in making.  Rings for example, require a ring mandrel.  Flattened wire requires a hammer and also then a steel bench block.  Pendants require a dowel of some sort to create a bale.

So before you buy anything, if you're brand new to making wire jewelry,

  • Think about what you want to make as your first project.  
  • Look at a ton of images on the internet for ideas and inspiration, get to know what you 'like', what you're drawn to, what excites you, to know what you might want to make.  
  • As you look at and are inspired by images, pay attention to tools and materials being used or
    information on what it would take to create such a piece.
  • See if there are 'additional skill sets' required to complete the desired project.  You might need to solder for example and if that's more than you want to learn in order to create wire jewelry, then perhaps you need to consider a different project... OR put your mind to learning soldering too! ;)
  • Learn a bit about the 'metal' and how the wire will behave. Wire comes in many gauges, shapes and tensile strengths, all good for different purposes.  
  • Learn what it takes to 'complete' a piece... does it require earring hooks?  A pendant bale?  Links, head pins, additional beads, chain, clasps?
Here are some links to my Pinterest galleries:

My Perfectly Twisted Jewelry for inspiration!
http://www.pinterest.com/izzygumbo/my-wire-jewelry/
Wire and Beaded Inspiration - A collection of other amazing wire & beaded jewelry artists and their works
http://www.pinterest.com/izzygumbo/wire-beaded-inspiration/
Wire Findings - A collection of 'beautiful finishes' on jewelry
http://www.pinterest.com/izzygumbo/wire-findings/

Be inspired by all the gorgeous beads and cabochon!
http://www.pinterest.com/izzygumbo/jewelry-supplies/

Look through free wire Jewelry patterns and tutorials:
http://www.pinterest.com/izzygumbo/jewelry-patterns-tutorials/
and remember to note the tools and materials needed (keep it simple to start with)...

Get the tools and supplies appropriate for your project.  Start with simple materials, craft or copper wires rather than precious metals, beads with holes that are easy to work with.  Visit your local hobby / craft store (Michael's or Hobby Lobby are awesome for beginner supplies).  Purchase a starter tool kit which should contain wire cutters and various pliers, find some fun and beautiful beads and any findings needed if you're not making your own.

Get a flat table cleared, some good overhead lighting or a bright table lamp and a good chair.  You're ready to dive in and just "make something!"  You'll love it and you'll find it a quickly addicting sensation, especially when you put your beautiful wire jewelry on your body!  The realization that you can make more and make anything you want, washes over you and that's all it takes... you're ready for more information on how to turn this delightful hobby into a blissful and loved art form...

Getting Started for Real...
Tools for Making Wire Wrapped and Beaded Jewelry
Jewelry Measurement, Helpful Charts
Health and Posture at the Jewelry Table
Your Jewelry Work Space

Google and study up how to make wire wrapped jewelry.   My ways are only my own suggestions based on my own experiences.  I'm self taught via Google, Youtube and several months of hunting down free tutorials, plus a few I purchased.  :))

Enjoy the exploration... there is a world of wonderful information out on the internet. Youtube offers many free jewelry making video tutorials, so look into them and enjoy!  I have a link under the header of my blog page if you're interested.  I've learned from the videos, I also scout out and update my links to other free tutorials offered by other artists.  Be sure to check back with the Pinterest links above and my blog, for new content.


Have fun!  I hope you found all this helpful.
Visit my Etsy jewelry store and shop for unique one of a kind, quality handmade wire jewelry!
https://www.etsy.com/shop/PerfectlyTwisted
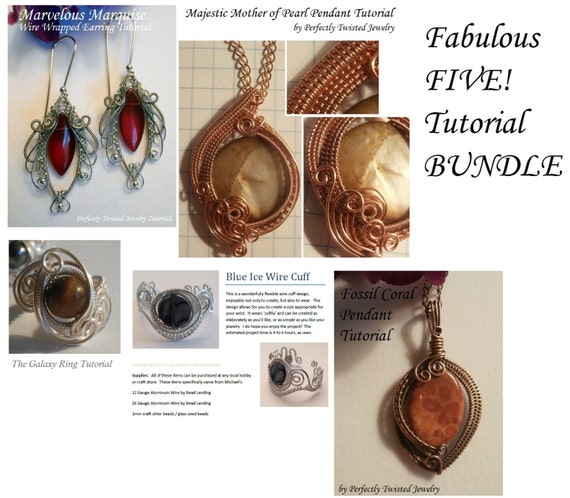
While there, visit my wire jewelry tutorials and learn to make more complex wire wrapped jewelry designs.


New Handmade Wire Wrap Jewelry!

Another post to share my newest wire wrapped jewelry!  I hope you find inspiration in the items and I hope they inspire you to visit my Etsy jewelry store!  :))

https://www.etsy.com/shop/PerfectlyTwisted

I've also just opened up a Facebook store so if you don't care to create an Etsy account to make a purchase, I hope you'll consider to visit my Facebook store and shop there.  


I've fallen in love with designing my Bonsai version of the Tree of Life pendants!  I created these in solid copper wires which have been lightly oxidized.  In some of the pendants, I've attached an abundant canopy of Peridot, Citrine and Amethyst beads, but thought I'd also try something new too... so I made two of them with wire canopies and used rough Aqua Marine crystals for the base.  I hope you enjoy the eye candy and please let me know what you think of them!  :))  Many hugs.


New Jewelry Tutorial! O! My Goddess, Wire Wrapped Earring Project, Marquee Bead, Wire Weaved Jewelry


This is a wonderful and fun earring design, created so that you can attach most side drilled beads that are marquee shape, oval or teardrop. With small alterations to the wire and bead sizes, you can also use this pattern to make a matching pendant for the earrings!

Please check out my Etsy jewelry store and learn how to make wire jewelry with my easy to follow jewelry tutorials and patterns.

The earrings will measure approximately 2 inches long (including the ear wires) and 3/4 inches wide. There are 19 pages, over 132 clear and close up images in 48 detailed steps to guide you through the project. The estimated project time is 3 hours.

The tutorial uses copper wire, but you can use any type of wire. It is important however, to use the
sizes indicated in the supply list or contact me with questions regarding using other size wires. I’m happy to help.

Enjoy!  Purchase this jewelry tutorial pattern in my Etsy store...
https://www.etsy.com/shop/PerfectlyTwisted

To go directly to the listing for the tutorial, click here.

Supplies: All wire is round, dead soft
20 gauge wires (frame wires)
30 gauge wires (weaving wire)
2 Marquee beads 26mm x 10mm, side drilled
2 Round beads 4mm

Tools:
Nylon nose pliers
Flat nose pliers
Round nose pliers
Wire cutters
Jewelers file or nail file
15 mm dowel (or a cap from a 4oz Elmer’s glue bottle)
Grid paper (optional)

New in the store! Unique Handcrafted Wire Jewelry! https://www.etsy.com/shop/PerfectlyTwisted

Just wanted to share what I've been up to this past week.  These are a few of my latest creations which can be found in my Etsy jewelry store.  https://www.etsy.com/shop/PerfectlyTwisted

The O! My Goddess Marquee Earring tutorial will be out in a few days!  I hope you love them and I hope you'll be checking the shop for the tutorial listing!  I think the design is fun, bold and gorgeous!

Enjoy the inspiration!

 
  O! My Goddess!

New Tutorial! The Elegant Ear, Wire Wrapped Earring Pattern, Handmade Jewelry

You asked for my ear.... so now you have it! :))
You can shop for this wonderful tutorial at my Etsy store...
Click here to go directly there.

This is one of my most favorite designs and I created it so that it would be a wonderful compliment to the Majestic Mother of Pearl Pendant Tutorial. 

This pattern is gorgeous and can be created with any type of round, drilled bead. I used brushed copper puff beads, but you can also use your favorite gemstone beads, flat or round OR even oval shaped.

There are over 150 clear and close up images and 34 steps of detailed instruction to guide you through the project. And certainly, I'm always here for you and welcome your contact if you have any questions along the way.

Have fun with this tutorial and add these unique and beautifully designed earrings to your outstanding collection of wire jewelry skills.

This is an intermediate to advanced tutorial project.

Supplies: All wire is round, dead soft
Two, 10mm, flat, round beads, drilled
Six, 10 inch lengths of 22 gauge wires (frame wires)
Two, 2.5 feet lengths of 30 gauge wires (weaving wires)
Two, 1.5 feet lengths of 30 gauge wires
Two, 3.5 feet lengths of 30 gauge wires
Two, 2.5 inch lengths of 20 gauge wires (earring hook wires)

Tools:
Wire cutters
Round nose pliers
Flat nose pliers
Nylon jaw pliers (optional)
5mm x 5mm grid paper (optional)
 

My Newest Tutorial! Majestic Mother of Pearl Pendant, Wire Weaved Jewelry Project

I had quite the time creating this one for you! It's a gorgeous design that can be weaved around any flat round or spherical bead. Once you’re practiced with it, you can easily modify the design slightly and use it for any shape of drilled bead. There are 125 clear and closeup images to guide you through 40 detailed steps. This is a wonderfully challenging project for anyone who loves the art of wire jewelry!

Click here to go directly to the listing

The tutorial uses copper wire, but you can use any type of wire. It is important however, to use the sizes indicated in the supply list.  Please feel free to email me if you have difficulty finding the proper size wires.  Enjoy!  It can be purchased for immediate download in my Etsy store... https://www.etsy.com/shop/PerfectlyTwisted


Supplies: All wire is round, dead soft
22 gauge wires (frame wires)
30 gauge wires (weaving wire)
One, 1 inch diameter, flat, drilled bead

Tools:
Nylon jaw pliers or flat nose pliers
Round nose pliers
Wire cutters