Coiled Coils Calculator

 Coiled Coils Calculator - you know I was gonna do it!! This is one of the hardest things for artists to figure out so I built us a Calculator! Here is the link...

https://www.perfectlytwistedjewelry.com/coiled-coils-calculator.html

Please let me know what you think and how accurate you think it is. Please use copper wires and not your precious metals if you are testing accuracy. I am still working on building it so your feedback is greatly appreciated! Much love! I hope this helps! Here's how it works: 1. Enter the desired finished length of your coiled coil. 2. Pick the Gauges of wire you're working with. 3. Press Calculate. 4. The results will tell you how long that first coiled wire needs to be to make your finished coiled coil length based on your gauges of wire. And that's the part that we need to know. Yay! In the example in these images, you can see that if I want a 2 inch finished coiled coil, and I am using 28 gauge for the first coil around 24 gauge core, and my final core is 20 gauge that I will tie onto the pendant with, then my first coil needs to be 8 inches long to get a 2 inch finished length on a 20 gauge final core wire. Try it! Let me know what you think. Thank you for participating and thank you for watching and subscribing to my channel! I work hard to bring us helpful tools, good techniques and beautiful designs.

Example image


#perfectlytwistedjewelry #wirewrapping #tutorials #diyjewelrymaking #wirewrappingtools #wirewrappingcalculator #coiledcoilscalculator

Wire Calculator

 Hi everyone! I've designed a wire calculator for you! It's on my website and I'm still working on it so I would love your feedback (can't make huge promises but I think it's a neat idea).... anyway, it's free to use, give it a try and let me know how you feel about it and how accurate you think it is. Please try this out with copper wires and not your precious metals as I do not promise it's precise for all designs. This is specifically for multi-wire bezel frames (traditional style). There are too many variables to design but this might help if you are wrapping traditional style pendants. It only calculates frame wire lengths and will give suggested gauges for your size stone. NOTE: This assumes minimal design on the pendant, there is enough to finish with a small curl or two, if you are planning very curly design, add an inch or two to the overall length it returns. The calculations also assume a finished bale of 1/2 inch with about 4mm inside diameter. You can always make a smaller bale too.

Here is how it works... 1. Choose millimeters or inches. 2. Input your cabochon dimensions... length, width, thickness 3. Press Calculate. 4. It returns lengths in millimeters and inches as well as bases the number of wires and length on your stone thickness. It also gives wire gauge recommendations for that size stone.
I appreciate your feedback so I can try to improve it for us! Much love! Many thanks for participating and for watching my channel! I continue to work to provide you with innovation, inspiration and great designs! #perfectlytwistedjewelry #howmuchwire #wirewrappingtools #wirewrapping #tutorials


Turn Simple Wires Into Awesome Jewelry!

Hey friends! This tutorial is from a past Membership Livestream, it was one of the projects we did that weekend... it's a super cute, wire woven bead pendant. The video edits might seem 'cut' here and there in conversation when I'm reading Member comments and responding, but the project steps are all here to accomplish this darling pendant. I hope you enjoy making this and thank you for watching and for your support of my artwork and my channel! Materials and tools are listed below. Materials: 3 x 13 inches of 20 gauge, round, soft copper wire (frame wires) 5 feet onhand of 28 gauge, weaving wire Round pillow or 'flat' bead, 12mm to 15mm and about 2 or 3mm thick (the hole must be able to fit the 20 gauge wire). Tools: Flush cutter Round Nose pliers Bent Nose or Chain Nose pliers (optional) hammer / bench block

Sophia Prongs! Creating Elegant Wire Wrapped Jewelry Pieces From Scratch

Hi friends, while I heal this tennis elbow... please enjoy Membership Tutorial, Sophia Prongs! You can learn to make the ring setting in the part 2 video, Sophia Rose! My continued love and gratitude for your support of my channel and artwork! Materials 1 x 26 to 30 inches of 21 gauge, soft, round, wire (26 inches of wire will be enough for a size 6 ring, add inches for bigger). 9mm Round Faceted Gemstone 12 inches of 26g weaving wire for ties. Tools Flush Cutter Bent Nose Pliers 3mm Flat Nose Plier and narrow flat pliers or Chain Nose Pliers

How to Make a Cool Wire Wrapped Skeleton Key Pendant!

🔑 Create a Stunning Wire Wrapped Skeleton Key Pendant | Easy Cabochon Jewelry Tutorial Welcome, wire wrapping friends! 💎 In this step-by-step tutorial, I’ll show you exactly how to make a gorgeous skeleton key pendant featuring an oval cabochon centerpiece. This design is perfect for beginners and seasoned artists looking for a fresh, elegant project. ✨ We’ll start by weaving the intricate body of the key, then I’ll guide you through framing and securing the cabochon with a simple but stunning wire wrap. 🧰 Materials & tools are listed in the first 10 seconds—no guessing, just making! 🎥 Clear close-ups + easy-to-follow steps = beautiful results. If you love meaningful jewelry, vintage vibes, or turning stones into storybook treasures, this is for you. 🔔 Don’t forget to like, subscribe & tap the bell so you never miss a new tutorial!
Thanks for watching! Enjoy!

WIRE WRAPPED Earrings You Can Make Tonight!


Hi friends! I hope you love these darling Garnet drop earrings! The Garnet capture might take a time or two of practice but is very secure and super cute and not too bad after your fingers get it. ;) They're fairly quick to make and the earring hooks are so fun! I go slow and walk you step by step through wrapping the Garnet oval cabochons, then I walk you step by step through making these wonderful sculpted leaf earring wires! This is a wonderful technique for decorative and unique earring hooks! Tools and materials are listed in the first 10 seconds of all my tutorials. Thank you for watching! Enjoy! xoxo

Exclusive Behind-the-Scenes Wire Wrapped Pronged Pendant - Until July 30...


Hi everyone! I'm 20 days away from my relocation and short on time to make new videos for us, so I thought I'd share some of the Membership videos for a while to fill in the gaps. This is a commissioned pendant that I did a while ago, it's silent with some nice music, but you can really get a close-up of this style of prong creation... it's onboard the frame, rather than an independent wire for prongs. I hope it inspires you! Thank you for your continued support! Much love! Please read the video description for materials and measure. xoxo

Arbor Vitae, The Tree of Life Pendant Tutorial Reversible Two Sided Tree...


It's ready!  I hope you love it, Happy Solstice!  This is a new, FREE step-by-step, Tree of Life pendant tutorial!
Click the link below and have fun!  I take you through building the frame, sculpting the tree and then joining them into this gorgeous reversible Winter Solstice pendant.
I made this new frame design so that you can cover up and not worry about all the little bitty tree wire ends! Whoot!

#perfectlytwistedjewelry #wirewrappedjewelry #tutorial #treeoflife

Free Picture Tutorial - Part 1 - How to Wire Wrap a Designer Cabochon, Creating a One of a Kind Wire Pendant

I've been emailed several times, being asked if I could create a tutorial on how to wire wrap an un-drilled cabochon.  It's a difficult request in that most designer cabochon are not of a uniform shape or size... making the giving of exact measurements a hard thing to do.

Then I realized... more important than giving exact measurements, is to perhaps, give the 'idea' and thought process behind wrapping an un-drilled stone.  So I invite you into my studio during the creation of this pendant... and I'll share 'what I was thinking' while I built it.  I'm still a learning student of this art myself... so there might be better ways, but this is one of 'my ways' ;)

When wire wrapping, using a stone or bead WITH a hole makes 'capturing' the stone or bead, fairly easy.  You put a wire through the hole somewhere in your design process and wrap around it in a beautiful way.  Wrapping a cut cabochon, with no holes, is another matter and requires a different thought process.

The un-drilled cabochon won't stay in place or secure within the wire, unless you're able to build a 'harness' around the stone, all the while, creating a beautiful design and functional bale, in the case of a pendant.

I've put together images hoping to show this process.  I don't always have a design in mind to begin with, other than the initial bale I intend to use.  Many times that alone, will drive the rest of the creation.  Many times, the shape of the stone and any color variations it might have, will also drive the over all design.

Due to their unique shapes, using grid paper helps to keep an eye on symmetry.  Even though many of my pendants are more 'free form' than not, there is still a balance to maintain... keeping the stone centered within the pendant for example.  Re-aligning your project to grid points will help a great deal, while you work.

I hope these 'tricks and tips' of mine, help you along your creative way!
My other tutorial projects can be found for sale in my Etsy jewelry store.  I hope to see you there!

Click each image to enlarge and get a close up.  Enjoy!


For stones with odd shapes, use a string, wrapped around the stone, to help measure for wire length needed.  For this project, I used four, 20 gauge, sterling silver wires for the frame, cut to 13 inches each.


I used 30 gauge sterling for wrapping wire, in various lengths throughout.  Using grid paper helps to keep your stone centered during creation and aids with symmetry throughout the design/creation process.


The stone has to be 'captured' from all sides....

'Locking down' wires along the way, helps to keep the pendant harness tight around the stone and the design stable.  Needless to say, it's also a matter of added quality, to your finished piece.

While the back side gets a bit 'sacrificed' to secure wire ends, invest the time to keep it as neat and attractive as possible.  The back side wires should also be placed with purpose, to ensure that they secure the stone into place and prevent it from 'slipping out'.


Designs in front should be created with the same in mind... they serve a decorative purpose, but also to secure the stone into place.


Bringing wires from the back to the front and from the front to the back, in decorative and elegant ways, begins to build the layers of this 'harness', around the stone.  Using this type of 'harness', leaves a lot of room for free form creativity.


Wires can be terminated either in the back of the pendant or in the front.  Either way, try to secure the end in such a way that it won't catch or shift out of place.  Longer lengths might require some type of loop to lock them into place, such as I have done in the image below.  Short tight spirals that don't have a long wire length lay much neater against the stone and don't require so much thought about 'catching' and bending out of shape.

While sides might look like they are secure, always 'jiggle' your stone with reasonable pressure to test it.  It should not slip out due to being lovingly handled :)

Do this BEFORE you cut away any remaining lengths.  You might need to add additional 'design' to secure the stone.

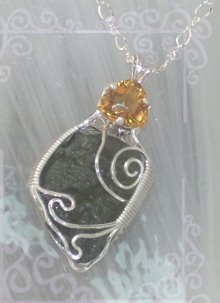
In this case, I created a coil and brought it down the long side of the cabochon.... I'm locking it into place, using the two decorative wires from below.  


I create a decorative loop, add a bead and bring the wire back up the front side of the cabochon.

It's locked into place along the back, using an attractive spiral.


The stone can still slip out the top of the pendant... so I use the two remaining wires from above.


Come back for Part 2 and see how this beautiful pendant is finished...

In the meantime, I hope you'll consider to visit my store for some of my other wire projects!  

https://www.etsy.com/shop/PerfectlyTwisted

While this project is a 'visual' about design... the tutorials within my store contain all the fine details, including material information, lengths and step by step instructions on how to create these weaving patterns. 


All designs and written information are copyright and can not be used to recreate a tutorial by any other party without written consent. Page copy protected against web site content infringement by Copyscape

Free Picture Tutorial - Part 2 - How to Wire Wrap a Designer Cabochon, Creating a One of a Kind Wire Pendant

My other tutorial projects can be found for sale in my Etsy jewelry store. I hope to see you there! https://www.etsy.com/shop/PerfectlyTwisted 

While this free project is a 'visual' about design... the tutorials within my store contain all the fine details, including material information, lengths and step by step instructions for each project.  When visiting my store, please feel free to read my customer reviews!


 Click each image to enlarge and get a close up. Enjoy!


Here, we're down to the last couple of wire lengths and while they can be simply finished off, it's more fun to use them for added design.


Sometimes, the work invested is 'on the back' but pays off by 'showing' along the sides or the front.  In this case, I use the back wires to add substance to the sides and back of the pendant.

15 


Taking time to manipulate wires into elegant curves will make a huge difference in your finished project.  

If the curves are not elegant and contain small, out of balanced 'kinks'... use round nose pliers and a very light touch to smooth out the curves and remove the kinks.


I invest time into the back, not only to make it as attractive as I can, but also to ensure that the cabochon is held tightly within the wire.

I take a lot of pride in the fact that I don't use glue or solder to hold the stones in place.  And I take huge pleasure in knowing that they won't ever just 'fall out' either. :))
This lovely pendant can be found in my Etsy jewelry store!

https://www.etsy.com/shop/PerfectlyTwisted

Please also visit my catalog of wire jewelry 
tutorials by clicking here!

I hope you had fun, I hope this gave you some new ideas and fresh inspiration!  Thanks for visiting and I'd love to hear your comments.


All designs and written information are copyright and can not be used to recreate a tutorial by any other party without written consent from me. Page copy protected against web site content infringement by Copyscape

New!! Focal Bead Wire Wrapped Gemstone Pendant TUTORIAL


Here is my latest free pendant tutorial!  You can find it on my Youtube channel.
I hope you enjoy!  Please remember to subscribe ;)

I've had several asking for a tutorial on simple shaping, hammering, and sanding, so I created this sweet pendant tutorial.  It uses a top, side-drilled, focal gemstone bead, but I designed the frame in such a way that you could also substitute it with a cabochon of a similar shape. 

I show a new bale design which I feel is easy for the beginner to construct and versatile as it sets you up for either a pendant bale loop or for earring loops.  The matching earring tutorial is coming soon, so keep an eye out!
Tools and Materials for this video are listed in the front of the video.

#PerfectlyTwistedJewelry #wirewrapping #wirewrappedjewelry #wirewrappedpendant
#wirewrappingtutorial #tutorials #diy #handmadejewelry #wirewrappedfocalbead #wirewrappedbeads
#wirewrappingbeads #focalpendant